Decals on Alps Printers
Many people know that you can print your own decals from your computer, but the Alps printer lets you print colored decals which can even be used on colored rockets!
|
Note that the Alps MD5000 described here is no longer in production
(and I haven't used one in a long time).
However, this popular printer still has an active following and a discussion group:
alpsdecal on Yahoo Groups.
Some of the techniques described here might also be useful to people using other printers. (For example, there are decal papers that work with ink jet printers.) Custom water-slide decals are easily available through Internet businesses. I have used Tango Papa Decals and Bedlam Creations and been happy with both. Another alternative is vinyl sign shops such as Fast Signs, which is what I use for larger artwork. |
The Printer
What you need:
- computer and drawing software (I use Adobe Illustrator 8.0)
- an Alps micro-dry printer (I have the MD5000)
- decal film (available from Scale Sports)
- decal set to "melt" the decal (available from hobby shops)
 The Alps printers do something very unusual and very useful: they can print white!
This is important because if your rocket has a colored background,
decals which use color will have their colors altered by the rocket color.
Of course, if you want white lettering or graphics on a colored rocket you also need
to be able to print white.
The Alps printers do something very unusual and very useful: they can print white!
This is important because if your rocket has a colored background,
decals which use color will have their colors altered by the rocket color.
Of course, if you want white lettering or graphics on a colored rocket you also need
to be able to print white.
The Alps printers also work better for decals than laser printers or copiers. Laser printer (and copier) toner is too granular and will flake off the decal paper when the sheet is bent. It also tends to run and smear when you try to cover it with a clear coat. The Alps ink goes on with a smooth, slightly raised surface which looks much better on the decal film and stands up to Testors Top Coat.
These printers are also very good for digital photographs, especially MD 5000 with the optional dye sublimation kit on the special paper. I've used an Alps MD 1000 and had great results with it for rocket decals. I recently bought the Alps MD 5000 because of its high quality with photographs.
The Alps printers use cartridges like the old typewriter ribbon cartridges. When you buy your printer, you will get a set of cartridges. Be sure to buy a white cartridge at the same time. They also have some other special cartridges which print metallic colors. The MD5000 holds up to seven cartridges so you can put white in place of one of the two black cartridges.
The Technique
There are two tricks you will use to make a colored graphic with a white background: "spot colors" and the "overlay option." The Alps printer software allows you to print using only a single one of the special color cartridges such as white or the metallics. This is called a "spot color" and the artwork you print will use only that color. Typically your artwork will be all black, but will come out the special color because of the spot color option. The overlay option allows you to print multiple times to the same page. The page is not ejected from the printer so the different printings are aligned properly. The sequence of steps is described below.
First off, draw your logo in your favorite drawing program. Normal text is quite easy. If you have a bitmap, you can import it, but the quality will not be as good unless the bitmap is very high-resolution. Once you have your graphic done to your satisfaction, group it and save your file.
I use layers to keep the white background separate from the images. If your drawing program doesn't support layers, you can use separate files. Make a new layer below the current one and name it "background". Name the current layer something appropriate (such as "logo").
Select the logo layer and copy your grouped graphic.
Select the background layer and paste the graphic.
Align the two graphics so they exactly overlap by dragging the copy on the
background layer. Once they overlap exactly, hide the logo layer.
Now we need to make the background into a solid black mask. Select the entire graphic element and give it a black fill. Change the color of all text to black. You should end up with a solid black shape with the same outline as your logo. (If you like, you can delete any graphics totally inside the outline.)
Once you have your background image properly blacked out, hide and show the layers alternately and make sure the images still overlap properly. We're going to print in two passes, using only one of each of the two layers at a time. The white layer will be printed first and provide the background for the colored layer.
The way drawing programs (and printers) work is that white areas are not printed since it is assumed that the page is white. If you draw a white square on the page and give it no border (or a white border) and print it, no pixels will be drawn. This is also true of the Alps, but we work around this problem by using the spot color feature.
Hide the logo layer and show the background layer. What you see it what will be printed in white on the first pass. Print, bringing up the printer properties as you do. (On Windows, select File|Print then click the Properties button.) Select "Single Spot Color" as the Color Format and a dialog box will pop up and you can select "white". Make sure the Overlay box is checked. If you're not sure, see the screen shot from my machine.
Now go ahead and print. You may have problems with the decal film feeding into the printer. I always have to help mine a bit. If you don't succeed the first time, hit the "ready/insert" button on the printer and you'll get another chance.
Once the layer is finished, the page will remain in the printer and you can go on to print the next layer. Hide the background layer and show the logo layer. Again when you print, bring up the properties dialog. This time, select "Standard Color" as the Color Format. Your colored logo will be printed on top of the white background.
To put the final coating on the decal and seal it, it is a good idea to print a final finish layer. If you print without the Overlay option, the finish will be put on automatically. But if you print with overlays (as we did above), you will need to do it manually. Show the background layer (which covers the entire printed area) and print again, this time selecting "Finish" as the Color Format and uncheck Overlay. Since Overlay is not selected, the decal will be ejected from the printer afterwards.
These decals apply just like other water transfer decals. I recommend using decal set, which is a water-like solution which melts the decal after it's been applied. This will help feather the edges of the decal and really make it stick to the surface.
Once the decal has thoroughly dried, you should protect it with a clear coat. I've had good luck with Testors Top Coat. Warning: Krylon Krystal Klear will attack the decals. It's a good idea to apply one of your mistake decals to a scrap body tube and try out your clear coat just to make sure it is compatible.
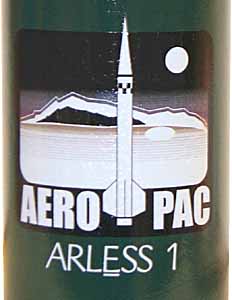
Note that the white and light colored areas in the rocket body tube on the right show up in their correct colors, even though the decal is applied to a dark green rocket. You now have a way to make any logo you need for your rocket!
Custom water-slide decals are easily available through Internet businesses. I have used Tango Papa Decals and Bedlam Creations and have been happy with both. For larger projects, I use vinyl sign decals from Fast Signs.
If you have questions about the Alps printers and decals, there is an active discussion group: alpsdecal on Yahoo Groups.