Cheap Tube Saw
I was idly leafing through the Harbor Freight Tools catalog and spotted something exciting: a tile saw for $60!
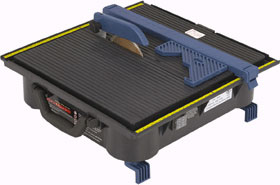
That's right, Harbor Freight's "home" brand, Chicago Electric (as in Chicago, China), 4" blade tile saw with a wet tray only costs $59.99. I immediately started thinking that this would make a great tool for cutting composites such as tubes and sheet goods.
One of the big problems with cutting composites is the fine dust that is raised. This is the kind of dust that goes into your lungs and doesn't come out again. A wet saw has the great advantage that water flowing over the cutting wheel washes away the dust (and more importantly, keeps it out of the air).
Of course, cutting composites is possible with carbide-tipped woodworking tools, but it dulls the tools very quickly. A tile saw seems like the perfect solution.
A Tube Cutting Jig
The tile saw works fine as-is for sheet goods, such as the widely-used G-10/FR-4 fiberglass sheet used for fins and electronics bays. But, I wanted to adapt this to cut composite tubes of arbitrary diameter.
Cutting large diameter tubes is always a problem. I have used various jigs to adapt a table saw by cutting in multiple passes, but this never results in a perfect edge. A jig which was made just for this purpose and allowed the tube to be rotated across the blade would do the trick.
My goal for the jig was to be able to cut perfect ends on custom-made tubes. This meant that I couldn't count on either end being square, so the jig couldn't rely on a traditional fence. I also didn't want to use a miter guage and make multiple passes, especially on a saw made out of plastic.
That meant a jig, built around the tile saw, that would enable the tube to turn through the blade on rollers, with a guide that ran inside or outside the tube being cut.
Below are more details on building and using the jig:
Modifying the Tile Saw
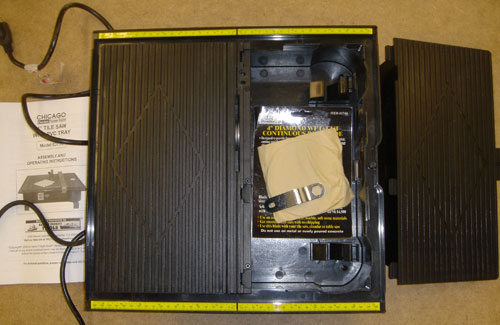
I took apart the tile saw to see how it worked and what parts were supplied. Below you can see the saw parts that come in the box. (I've already discard the so-called guard and fence.)
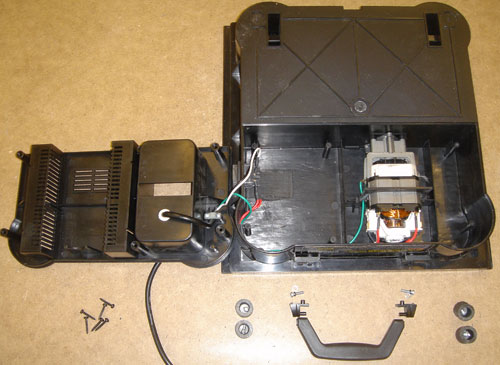
I removed the handle and feet, since it was going to be mounted into a plywood platform. Below you can see the saw with the bottom panel removed. After removing the handles, I epoxied plastic over the holes. Though rest of the saw case doesn't seem all that waterproof, but I didn't want to make it more leaky.
Once these simple modifications were complete, I reassembled the saw and set it aside. The next step was to make the platform which would contain the saw and support the rollers for the tube.
The Platform
I wanted enough support so that I could cut half off a 4' long tube, which meant a substantial platform to support the rollers. I cut out a rectangle for the saw at the right edge of the platform and raised it high enough so that the saw bottom (and its cord) would clear the ground.
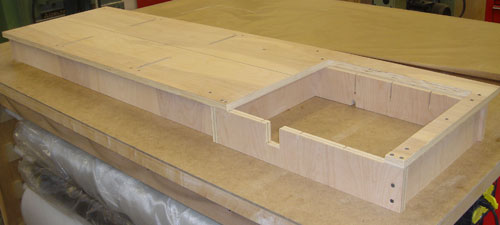
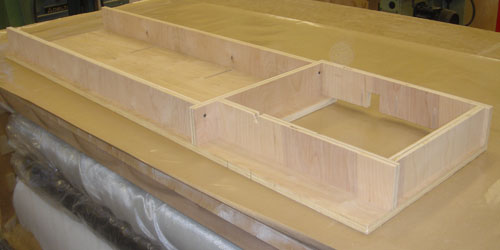
The pictures above show the platform from the top and bottom. Below you can see a close-up of the box area. Note that the box is set to the front of the jig because the blade is not centered on the saw, but set more toward the back edge.
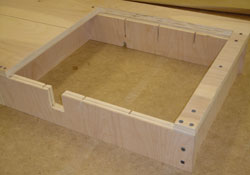
The top of the saw is larger than the body so it sits into the top of the platform and the front and back edges of the top rest on the front and back plywood stringers that form the box.
Note how I cut a slot for the cord to exit the back and another one for the power switch in the front.
I also had to cut slots in the front and back plywood strips to accomodate the plastic ribs reinforcing the top of the saw.
Finally, I painted the platform with epoxy to seal it from water.
The Rollers
I wanted to make sure the tube stayed aligned with the jig as it turned so I needed some sort of guide system. Various ideas were considered, including building in-line skate wheels wooden frames. I happened to be at Lowes when I saw they had a sale on roller stands. The roller is mounted on a small frame and I just used that part, without bothering to assemble the "A" frame legs.
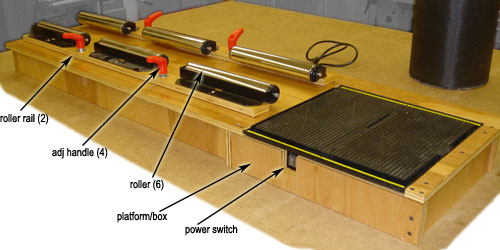
I mounted three of these rollers onto each of two plywood strips. The rollers would cradle the tube and the strips could be moved in and out from the center of the jig for different size tubes.
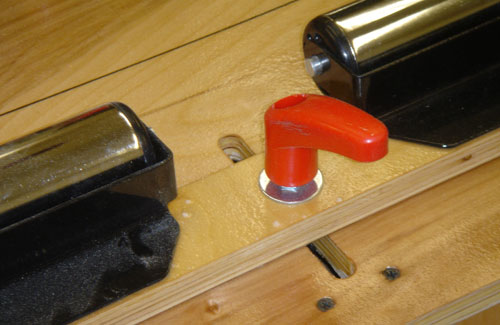
Above you can see a close-up of one of the four adjustment points. Four slots were routed into the top of the jig four T-track block nuts were used below the slots. The red handles can be loosened and the rails moved in and out, then the red handles can be easily tightened to lock down the rails and their rollers.
Using the Jig
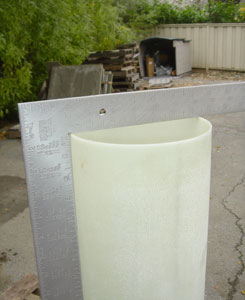
On Saturday, February 26, we tried out the jig for the first time. The first victim was a 100% fiberglass tube, 6¼" ID, made for couplers on an AERO-PAC group project.
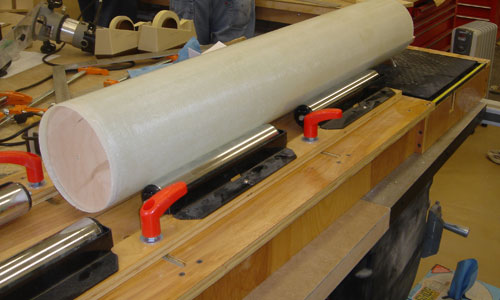
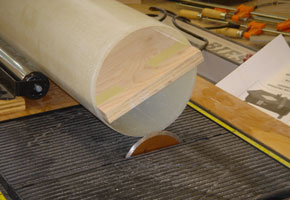
Above you can see the jig set up. The diamond blade is installed in the tile saw the tube is laid on the rollers. Below are views of the end, showing how the rollers are adjusted so the blade just cuts through the tube.
 |
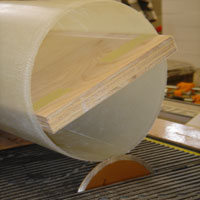 |
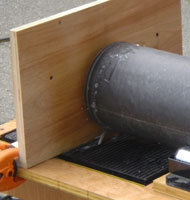
Note the wooden block sticking out the end of the tube. This is used to provide a square edge to rub against the fence (see below). Hand-made tubes initially have ragged ends so a separate surface must be used to keep the tube from moving side-to-side.
 |
 |
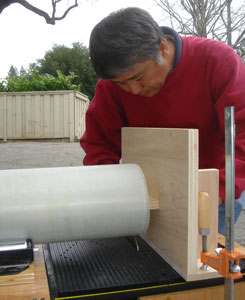
Above left you can see Mike Yamamoto adjusting the fence to butt against the end of the wooden guide block wedged into the tube. Later on, we figured out that driving a pan head screw into the center of the end of the wood guide block prevented the need for getting the fence perfect square since it would rub against a single center point.
Above right you can see the freshly cut tube, perfectly square and smooth!
 |
 |
Here is another view, showing an actual cut in progress. Here Mike Brest is cutting one of the carbon fiber airframe tubes for the project. There are some more pictures showing larger tubes being cut on my Wac Corporal page.
Issues with the Jig
Of course, after the jig had been built and used, a few shortcomings were apparent. If you decide to build one of these jigs, you might want to think about these shortcomings and solve them in your version.
I found that the jig:
- doesn't cut short tubes well,
- doesn't cut to the center of tubes well,
- and it's hard to start the cut.
Tubes that are shorter than about 2' (a full roller width and the space between the right roller and the blade) are hard to cut because there's more hanging off the end of the roller than supported by the roller. The obvious fix for this is to make the rollers overlap the edge of the tile saw and come over nearer the blade.
This jig works well for cutting off the ends of tubes, making a good edge, but has some problems cutting to the middle. The problem is that there isn't support on the right side of the blade for the overhanging tube. The fix for this is also obvious: put rollers on the right of the blade.
Starting the cut is also a bit tricky because you have to lower the tube into the blade. (Tile saws don't raise and lower the blade.) What we found works best is to adjust the rollers so that the blade just cuts through the tube (no deeper than necessary). This creates the least angle as the tube is pushed down onto the spinning blade.
A better solution would be a way to raise the blade into the tube. This would require a way to hinge up the tile saw since the saw's blade doesn't raise. But, that could certainly be done by making the tile saw box hinge at the back of the main jig.
If I build a second version of this jig, it will move the rollers closer to the blade, add rollers on the right side, and hinge the tile saw so it can be raised into the work.